


Why buy from us?
Lorem Ipsum is simply dummy text of the printing and typesetting industry.
Ask a Question About This Product
- Stock: In Stock
- Brand: OEM
- Model: RLMKB1054
- Location: https://detail.1688.com/offer/661267452182.html

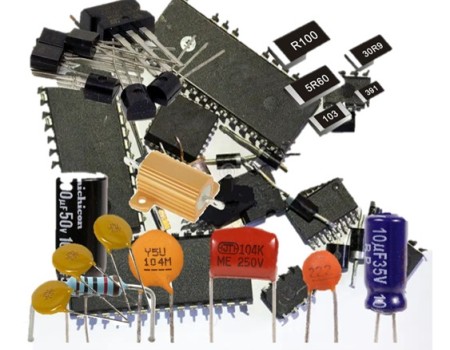
 Micro 130 Small Motor, Four-Wheel Drive Vehicle Motor, Dc Small Motor, Small-Scale Production, Medium-Sized Motor")


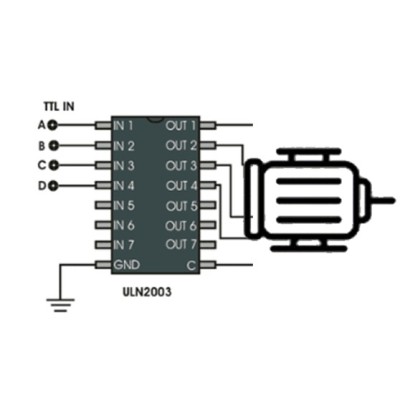
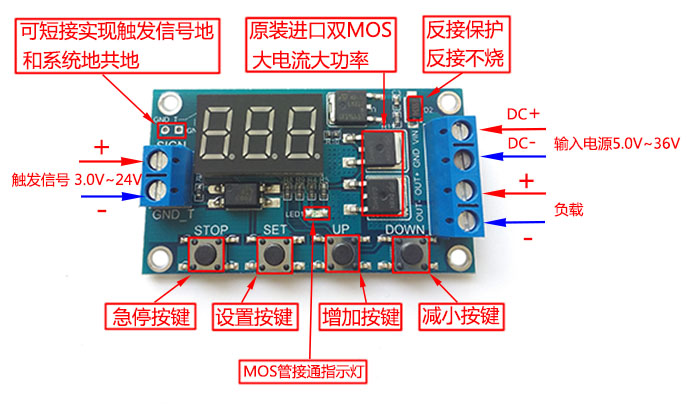
Trigger loop timing delay switch circuitdoubleMOS tube control board replaces relay module 12 24V
zero point oneSecond (minimum)~999Minutes (maximum) continuously adjustable
This product is simple to use and has powerful functions, but please take a detailed look at the operating instructions of this product. It is a very practical product.
Module features and uses:
oneRealize high-frequency, fast, and frequent on-off of circuits, unlimited switch times;
twoThe on-off process will not produce noiseNo electric sparks, no electromagnetic interference;
threeThe service life is longer than that of commonly used electromagnetic relays;
fourAdopting doubleMOSParallel active output, lower internal resistance, higher current, and strong power,at room temperature15A,400W,Satisfies the usage of most devices;
fiveOften used for controlMotor, light bulb,LEDLamp strip, DC motor, miniature water pump, solenoid valve, etc,Through this module, it is very convenient to easily control these devices.
Module highlights:
oneWide voltage operation(5~30V)Most devices can be used and are very convenient;
twoClear and simple interface, powerful functions, easy to understand, almost meeting all your needs;
threeThere is a one click emergency stop function(STOPKey), with reverse connection protection, reverse connection does not burn;
fourAfter adding sleep modes,fiveIf there is no operation within minutes, the monitor will automatically turn off;
Wake up with any button;
fiveCan be set differentlyOP、CL、LOPParameters, which are independent of each other and stored separately;
sixAll settings parameters will be automatically saved upon power failure.

working mode
P1.1:After the signal is triggered, the relay conductsOPDisconnect after a certain period of time, triggering again will be ineffective until the timer ends
P1.2:After the signal is triggered, the relay conductsOPDisconnect after time, trigger re timing again
P1.3:After the signal is triggered, the relay conductsOPDisconnect after time, trigger again and stop immediately
P1.4:Start up only once, countdown onceOPtime
P2.1:Execute once after triggering, disconnectCLTime, conductivityOPTime, triggering again is invalid until the timer ends
P2.2:Execute once after triggering, disconnectCLTime, conductivityOPTime, trigger againCLtiming
P3.1:Execute after triggeringOP,CL, cycleLOPStop again, trigger the execution to stop again within the loop
P3.1:Execute after triggeringOP,CL, cycleLOPStop again, inOPTrigger to stop execution again within the specified time frameCLTrigger re execution again within the specified time.
P3.2+UP F1:No need to trigger, boot cycleOP,CLtogetherLOPtime
P4.1:Conducted after triggering, delayed relay conduction after triggering disappearsOPTime, trigger timer reset again
Product Parameters
oneWorking voltage:6--30V
twoTrigger signal source: High level trigger(3.0V—24V)Improving the anti-interference ability of the system by not sharing the signal ground with the system ground (or by self short circuiting the common ground)
threeOutput capability: Can control DC30v 5AInternally or through communication220v5AEquipment within
4 with optocoupler isolation to enhance anti-interference ability, industrial grade circuit board, set parameters for permanent power-offmemory
Timing range
zero point oneSecond (minimum)~999Minutes (maximum) continuously adjustable
How to choose a timing range:
On the mode selection interfaceAfter setting the parameter values, passshort pressSTOPkey, select timing range
XXX. The decimal point is in units, timing range:onesecond~999second
XX. The decimal point of X is in ten places, and the timing range is:zero point onesecond~99.9second
X. X.X. decimal point fully lit, timing range:oneminute~999minute
For example, if you want to setOPyesthree point twoIn seconds, move the decimal point to ten places and the digital display will showthree point two
Parameter Description: OPConduction time,CLDisconnect time,LOPNumber of cycles(one—nine hundred and ninety-nineNext time,“---”Represents infinite loops)
These parameters are independent of each other, but they are shared by various modes, such as inP1.1Set the conduction timeOPyesfiveSecond, the user wants to switch toP1.2Mode, then enterP1.2When setting the corresponding parameters,OPcould also befivesecond
On the main interface (display)000)Short pressSETThe key will displayOP(CL,LOP)And corresponding timeXXX
If there are onlyOP(For example, mode)P1.1,P1.2,P1.3)In terms of time, press the button brieflySETThe key will only displayOPAnd corresponding time
If there areOP、CL、LOP(For example, mode)P3.1,P3.2)That short pressSETThe key will displayOPAnd corresponding time,CLAnd corresponding time,LOPAnd corresponding times
After setting the mode, short press on the main interfaceSETThe key can easily view the parameters set in the current mode, which is very convenient
How to set parameters
oneFirstly, determine the working mode of the relay
twoAccording to the working mode of the relay, inMain InterfaceWhen the module is powered on, it will flash the current working mode (default)P1.1Mode), then entermain interface,)“long pressSETkeytwoRelease in seconds”EnterMode selection interface, by short pressingUP、DOWNPress the button to select the mode to be set(P1.1~P-4)
threeAfter selecting the mode to be set (e.gP3.2)short pressSETkeySet the corresponding parameters, and the parameters to be set will flash(OPConduction time,CLDisconnect time,LOPNumber of cycles(“---”Representing an infinite number of loops), throughUP、DOWNAdjust parameter values, support long press (quick increase or decrease) and short press (increase or decrease)oneIndividual units); After setting the parameter values, useshort pressSTOPkeyTo select the decimal point position and timing range(Corresponding timezero point onesecond~999minute); short pressSETKey, set the next parameter for the current mode, the process is the same as above
fourAfter setting the parameters of the selected mode,long pressSETkeytwosecondAfter releasing it, the currently set mode will flash and then return to the main interface. Setting parameters is successful and very simple
main interface:Display when the relay is not working“000”(No decimal point), the relay has a decimal point in its working state, which is very clear
Mode selection interface: Long pressSETPress and hold the key to enter, after setting is complete, press and holdSETPress the key to exit and return to the main interface
STOPButton function extension:
Relay enable mode:
oneON :OPThe relay is allowed to conduct during the conduction time;
twoOFFThe relay is prohibited from conducting and remains in a closed state at all times;
On the main interfaceshort pressSTOPPress the button to achieveONandOFFThe switch between them will cause the current state to flash and then return to the main interface. (This function is an emergency stop function, a relay that can be opened and closed with one click)
sleep mode:
oneC-PSleep mode: Within five minutes, if there is no operation, the digital display will automatically turn off and the program will run normally;
twoO-dNormal mode: The digital display is always on;
long pressSTOPbuttontwoRelease in seconds to achieveC-PandO-dSwitching states will cause the current state to flash and then return to the main interface.